3D Visualization of your Building
In our previous guides on home design, 3D objects, textures and materials, you already got an impression of how you design your 3D views, the interior and the surfaces.
If you have implemented all of this and are finished with both the construction and the design, you might want to create nice 3D visualizations of your 3D view.
The 3D real-time visualization in Visual Building, both in normal mode and in presentation mode with real-time shadows, is a compromise between quality and performance. A good compromise, but you can only get the maximum result with further settings and following raytracing.
This requires a few settings in your 3D view itself and the appropriate settings for the calculation of the image.
The main steps are:
- Settings of light, usually sunlight, in your 3D world
- The sunlight depends on your position on the globe, date and time of day
- In addition, there are values for the brightness of sunlight and the internally generated brightness of the 3D view
- As a result, all these values also have an influence on the representation of materials and surfaces in your 3D scene and must be checked and adjusted if necessary. There are no always valid values for this, because some things depend on the building and its surroundings and others are simply a matter of taste
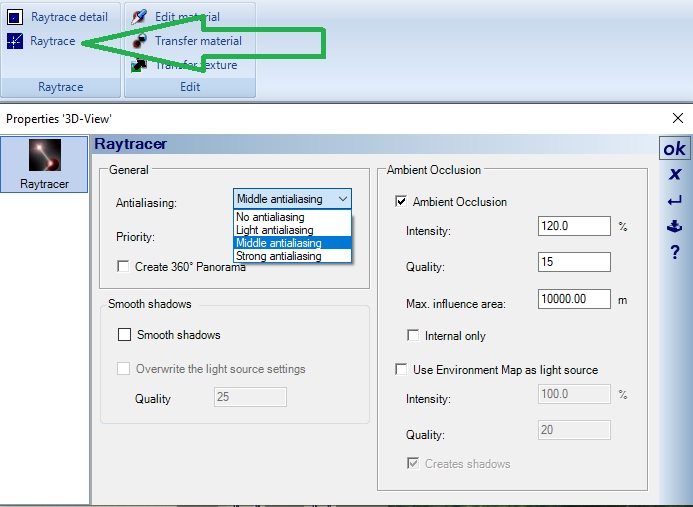
- And then you still need the appropriate setting for the raytracing itself, which you can get by right-clicking on the raytrace button in our 3D functions ribbon
- Photos of the real environment can be used as background images
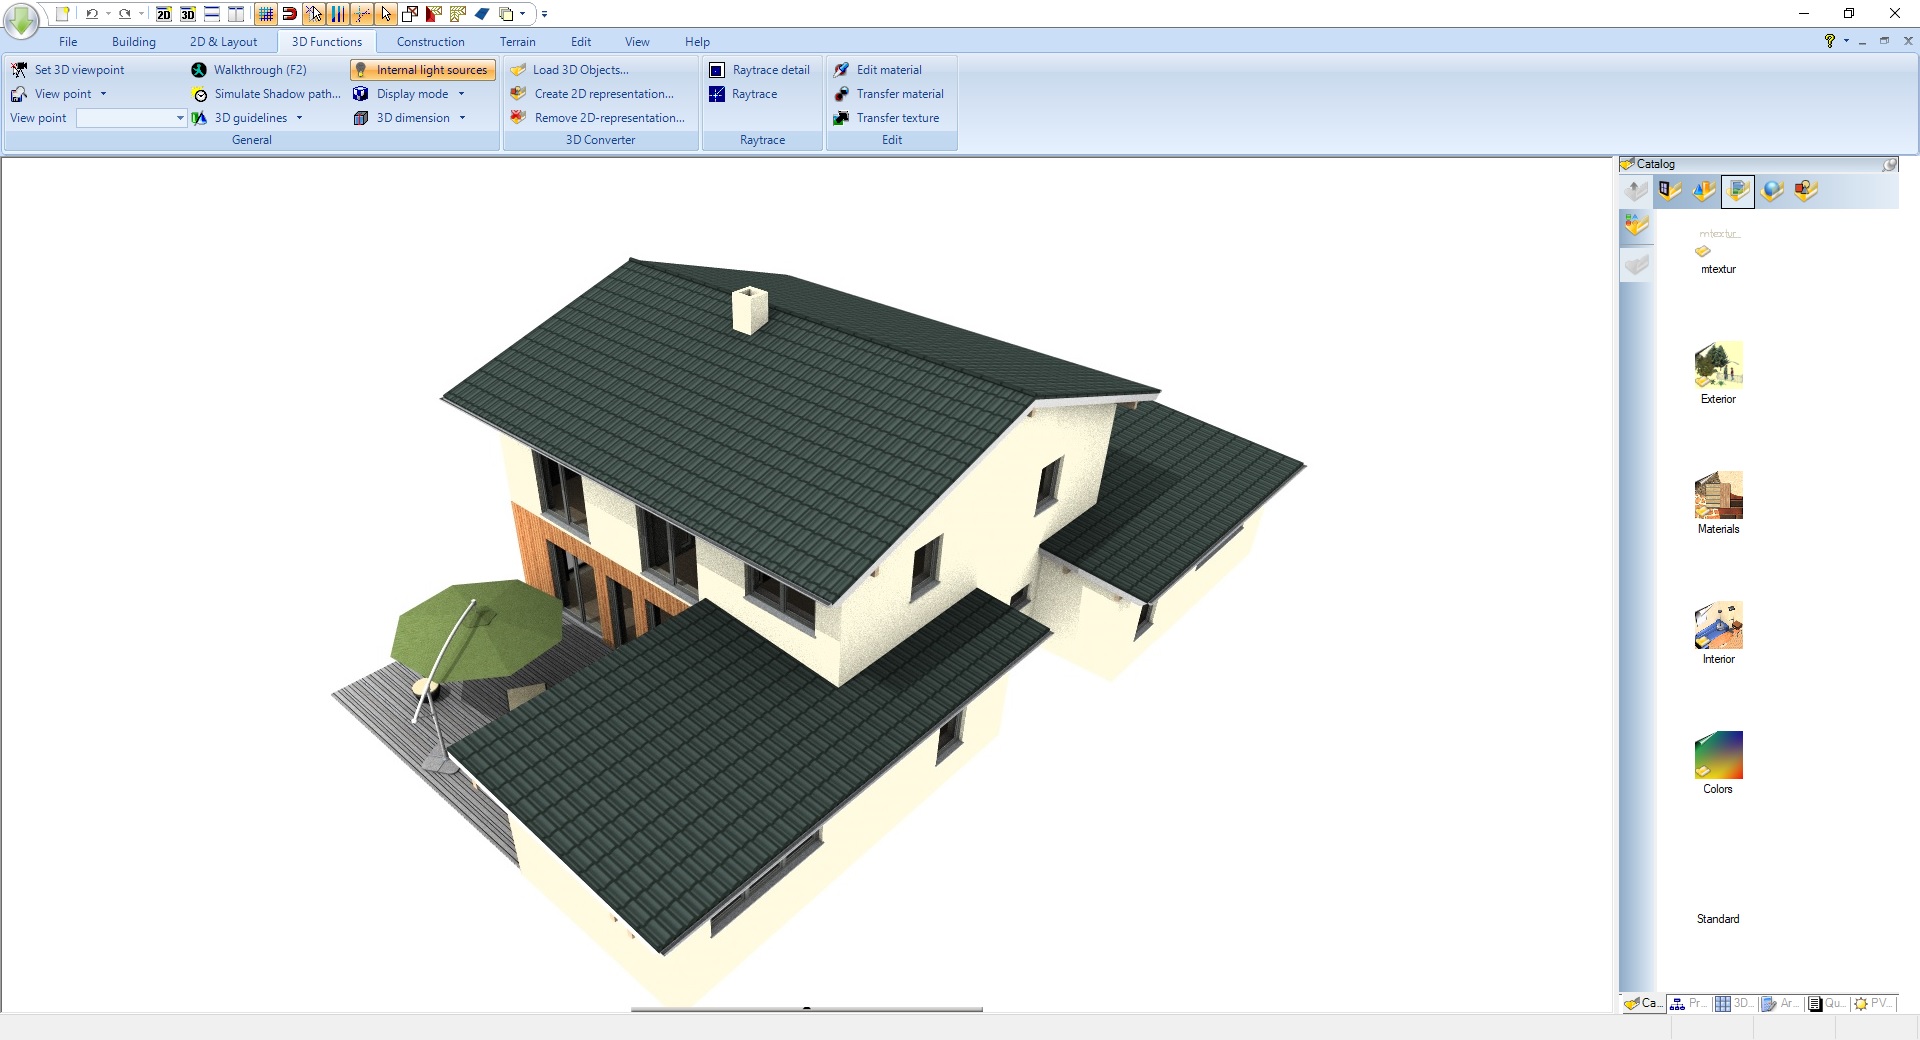
Here is an example 3D visualization with a background image
If you have implemented all of this and are finished with both the construction and the design, you might want to create nice 3D visualizations of your 3D view.
The 3D real-time visualization in Visual Building, both in normal mode and in presentation mode with real-time shadows, is a compromise between quality and performance. A good compromise, but you can only get the maximum result with further settings and following raytracing.
This requires a few settings in your 3D view itself and the appropriate settings for the calculation of the image.
The main steps are:
- Settings of light, usually sunlight, in your 3D world
- The sunlight depends on your position on the globe, date and time of day
- In addition, there are values for the brightness of sunlight and the internally generated brightness of the 3D view
- As a result, all these values also have an influence on the representation of materials and surfaces in your 3D scene and must be checked and adjusted if necessary. There are no always valid values for this, because some things depend on the building and its surroundings and others are simply a matter of taste
- And then you still need the appropriate setting for the raytracing itself, which you can get by right-clicking on the raytrace button in our 3D functions ribbon
- Photos of the real environment can be used as background images
Here is an example 3D visualization with a background image
More topics
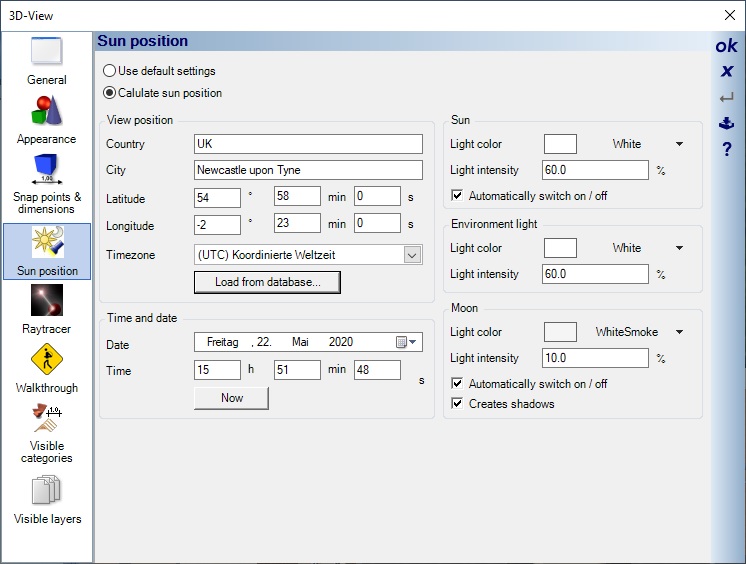
Determine the world position of your building
This is a property of every 3D view. Open the Properties dialog of the 3D view by opening the context menu with the right mouse button - Properties…
On the Sun Position page you can switch the lighting of the 3D world from neutral default settings to a specific city or coordinate. You could load the city with suitable values from the database or directly enter the coordinates as longitude and latitude.
On the Sun Position page you can switch the lighting of the 3D world from neutral default settings to a specific city or coordinate. You could load the city with suitable values from the database or directly enter the coordinates as longitude and latitude.
Sun light and environment light settings of a 3D view
This setting determines how bright the sunlight and the internal illumination of the 3D visualization are. These values can later be adjusted depending on the background image or the overall impression. If you have a background photo that was taken on a cloudy day, you will probably have to reduce the intensity of sunlight, otherwise your building will appear unnaturally bright in the 3D visualization.
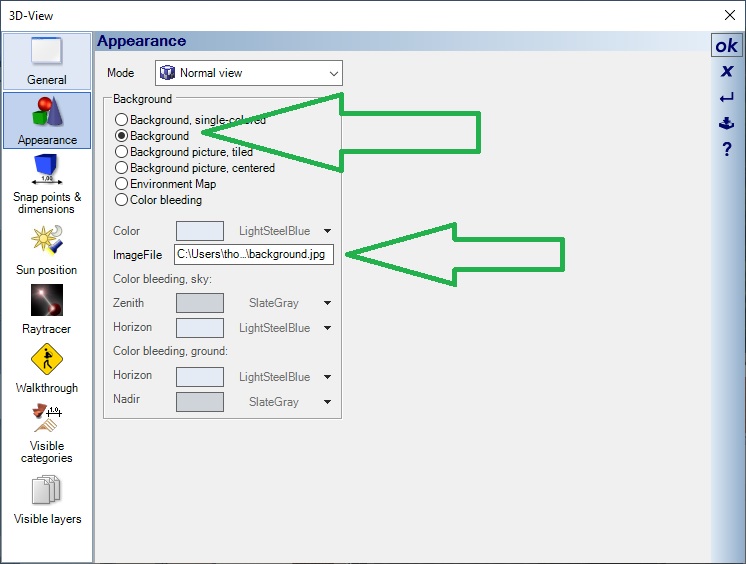
Using a photo as a background picture in your 3D view
As background for your 3D visualization, you can set different color modes on the Appearance page or use a photo of your property or its surroundings as background image.
The photo itself is scaled over the entire area of the 3D view and you then have to adapt your building to the image, not the other way around. This is done with our normal functions for zooming, rotating and moving the content of your 3D scene until it fits to the photo.
The photo itself is scaled over the entire area of the 3D view and you then have to adapt your building to the image, not the other way around. This is done with our normal functions for zooming, rotating and moving the content of your 3D scene until it fits to the photo.
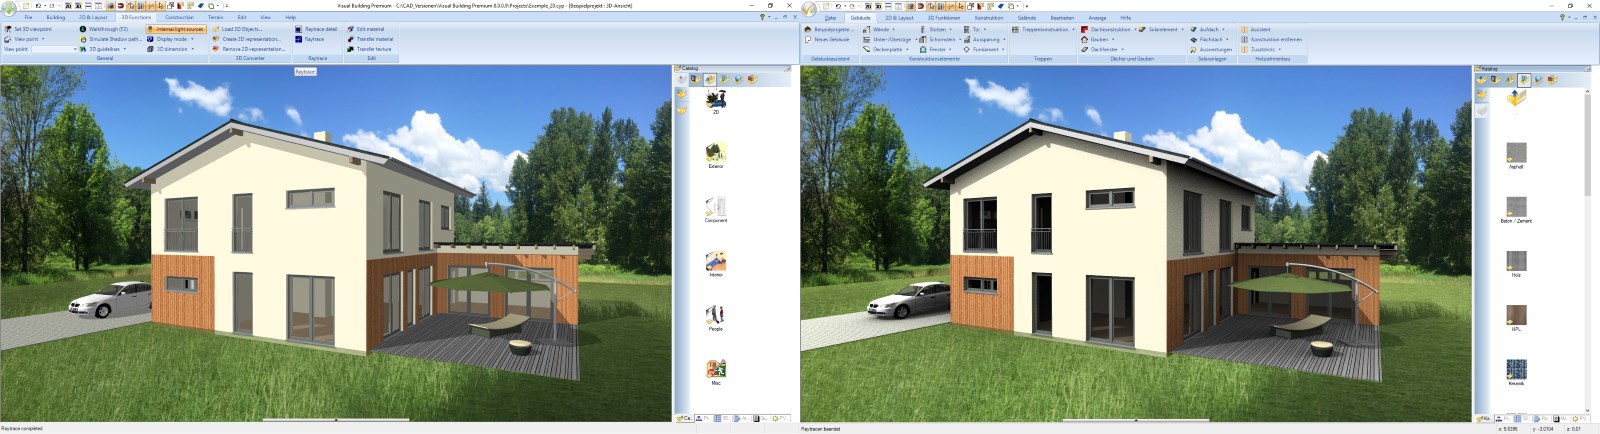
Raytracing, shadow calculation in your 3D views
There are two different methods for raytracing in Visual Building. Pure raytracing and raytracing with ambient occlusion. For views from outside the building, an image with ambient occlusion looks much more realistic. This method basically calculates two images and then merges them. One image contains the diffuse shadows that provide the realistic impression.
The following picture shows the same scene with pure raytracing on the left and additional ambient occlusion on the right.
The following picture shows the same scene with pure raytracing on the left and additional ambient occlusion on the right.
Preparing your 3D building visualization
It takes some time to calculate an image, and depending on the scene and settings, it can take up to an hour or two.
Therefore, before calculating the final image, you should check the above settings and the brightness of the included 3D element and adjust them if necessary.
Since the size of the image largely determines how long the 3D visualization rendering will take, you should first shrink the 3D view. In a way that you can still see the content but as small as acceptable. Then open the Raytrace dialog, activate ambient occlusion and the corresponding settings, but without antialiasing. Now click on the raytrace button and start the calculation.
Perhaps you then want to adjust the brightness of the scene and the material of certain content, such as of the terrain solid. To do this, use the Edit material function, click on the terrain for example and reduce the value of the diffuse portion.
Then start raytracing again. With a few tests and changes, you have the settings defined so that the actual 3D visualization of the building can begin.
Now activate the antialiasing in our raytrace dialog, recommendation "medium strength".
If you carry out the calculation directly in the 3D view, you will see the results with the toolbars of Visual Building as we show them in our screenshots. Alternatively, you can save just one image. To do this, use the "Save view as picture" function on our FILE ribbon. In the output dialog you can specify a resolution and activate raytracing with the settings you made earlier.
The following settings and elements have a significant influence on the needed calculation time:
- Number of 3D objects shown and their number of surfaces (e.g. for cars), but we don't want to do miss these objects.
- The resolution or size of the 3D view or image. Therefore, you should be careful and not calculate an image with 4000 x 3000 pixels if you only need one in 1600 x 1280
- Antialiasing: each quality level increases the calculation time by a factor of 4. Hence the recommendation “middle antialiasing”.
Saving and printing your 3D building visualization
The result of your 3D Visualization is always a picture in JPG, PNG or BMP Format.
You can now open this image in a standard software, e.g. with PAINT, WORD,…. And then print. A direct printing of 3D views is not intended in Visual Building.
As already described, the printing process could take hours due to the settings for raytracing and could block the computer.
While the image is being calculated, you can of course continue to work on other things on your computer, but better not on the construction in Visual Building. Or start the 3D visualization rendering during a break or in the evening.
3D Visualization of a Visual Building 3D Model in other software products
Visual Building supports several 3D Export formats and so you can use your construction and design for more than our own visualization.
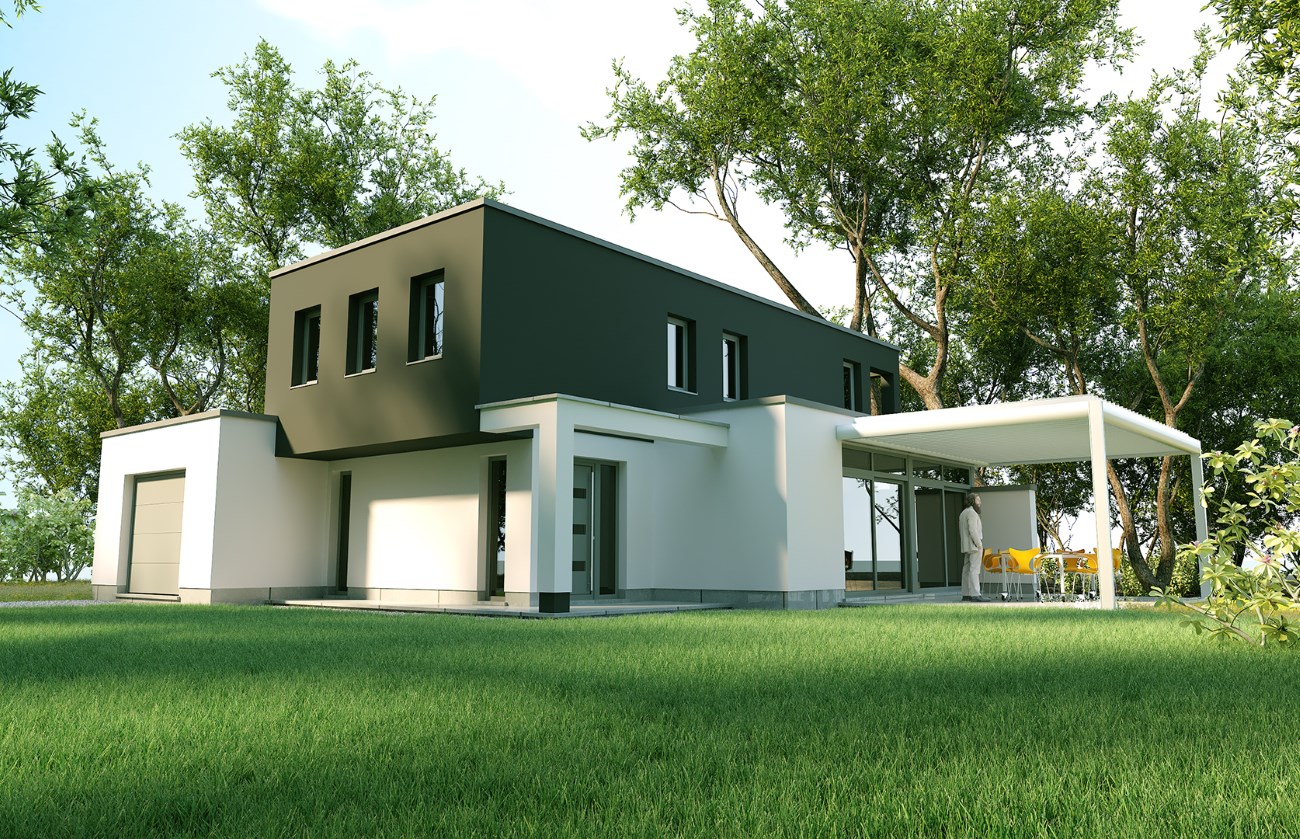
High end rendering engines can produce such a result below. Building construction made with Visual Building and rendering in 3D Studio. Yes, that is really photo realistic but a high end rendering software typically costs thousands of pounds and requires a deeper knowledge how to handle it.
The image was made by one of our customers.
If you have questions regarding your project…
send us your project file and, if necessary, background photos by email to customercare@visualbuilding.co.uk and we will assist you in finding the right settings.
Visual Building Basic

Has been developed as an easy to use design and visualisation tool for self builder,extentions..
£60.00
List price
List price
£39.00
Special online offer
Special online offer
Visual Building PRO
Used by all user groups specifically to create professional plans...
£120.00
List price
List price
£99.00
Special online offer
Special online offer
Visual Building Premium
Our most powerful design and visualisation tool specifically created for ...
£180.00
List price
List price
£149.00
Special online offer
Special online offer