What’s new in Visual Building 8:
An overview of the new features in our Visual Building versions 8.
As always, we have focused on adding features and content that we have filtered out of the suggestions and wishes of the users.
Main new features:
- Timber frame construction for walls (Premium Versions only)
- The new timber construction wizard analysis your project in seconds and adds timber construction to your existing walls (Premium Versions only)
- New timber construction export template. Writes a timber constrution list including sketches / elevations of each wall to a PDF, Excel, Word file, (Premium Versions only)
- Extended terrain element properties
- Excavation calculation and analysis. Automatically calculates excavation for buildings, foundations, individual 3D solids
- More than 650 new 3D objects added to the catalogue. Blinds, roller shutters, sliding blinds, radiators, ...
- New tools to adjust your 3D views, automatic top views, front views,....
- New foundation construction elements, strip foundation, bottom plate, single foundations. Including automatic excavation calculation.
- Open door representation in 3D views with adjustable angles
- Window and door dimensions on axis in your floor plans
-...
Details

Timber construction for walls, stud walls (Premium Versions only)
From version 8, the software supports the planning of walls in timber frame construction. This feature is included in our Premium versions only.
In handling there are basically two different ways:
A) You already know at the beginning of the project that the walls should be executed in timber frame construction. In this case activate the options in our extended wall dialog during or before you enter the walls. Just as before, when you set the properties of your walls before inserting.
B) You plan the project with "normal" walls or receive such a planned project from customers and add the timbers for the project only later. So you do not have to touch each wall individually, you are assisted by the wizard, which fills the entire project or selectable areas and wall types automatically.
Note: the function always analyses the whole wall and its connections as well as the contour of the walls under roofs. You should make sure that your walls do not consist of single wall segments. This would result in a meaningless distribution of the wood in the individual wall parts.

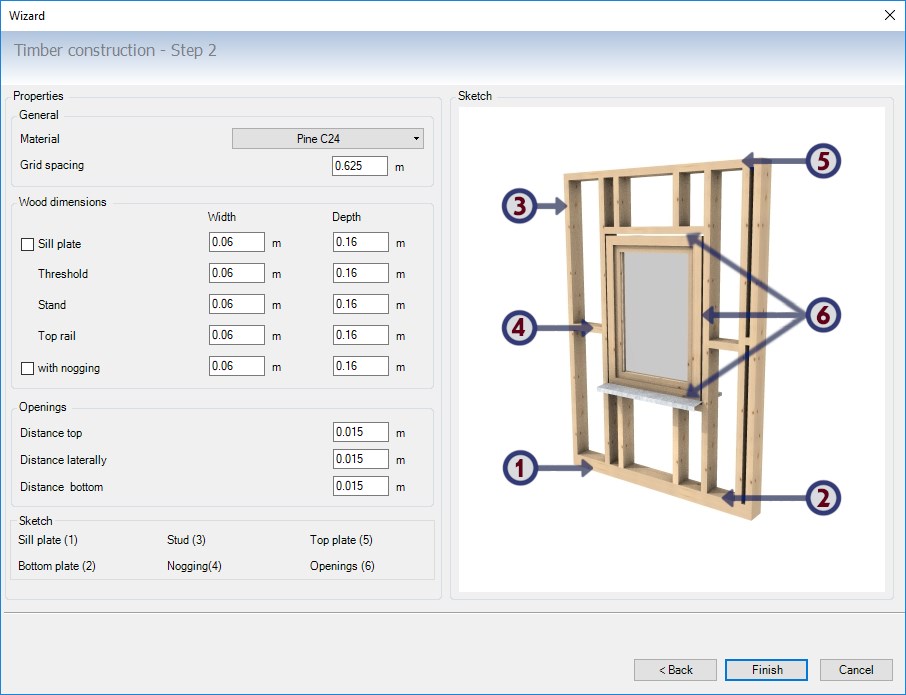
Extended wall dialog for timber construction (Premium Versions only)
If you have a version with the timber frame construction functions, the wall dialog is automatically extended by an additional property page.
On this page you will find an active sketch in which you can also perform certain actions with the mouse, as well as all the properties required to produce the timber elements.
General Settings
On the tab page "General" activate the timber construction via the checkbox. In addition, you specify the grid spacing for the distances between the studs.
Internally, we fill the walls with a grid consisting of fields that may also have individual properties. The grid spacing is the width of a grid field. At the end of each field a stud is created.
If your wall consists of several layers, you must determine in the lower part of the dialog in which layer the timber construction is created. If there is only one wall layer, this area remains deactivated and the timbers are created on the wall axis.
Note: it is generally not checked if the thickness of the timber elements fit in the wall layer or the walls. But you can immediately see that in your planning views when the elements stick out of the wall. So you have to make sure that the thickness matches the walls, or you may have to make the walls a bit thicker.
Timber construction wizard (Premium Versions only)
The timber construction wizard fills the entire project or selectable areas and wall types automatically with timber construction elements in seconds.

Extended Terrain Elements
Terrain elements such as paths, beds, terraces, etc. can now be given an adjustable height above the terrain and a setting for the excavation.
In addition, these elements can now also be selected in 3D views and edited via the polygon points. The contour can be changed as with other polygonal elements.
The name of the element, ie the logical name, is used for identification in our analysis dialog.
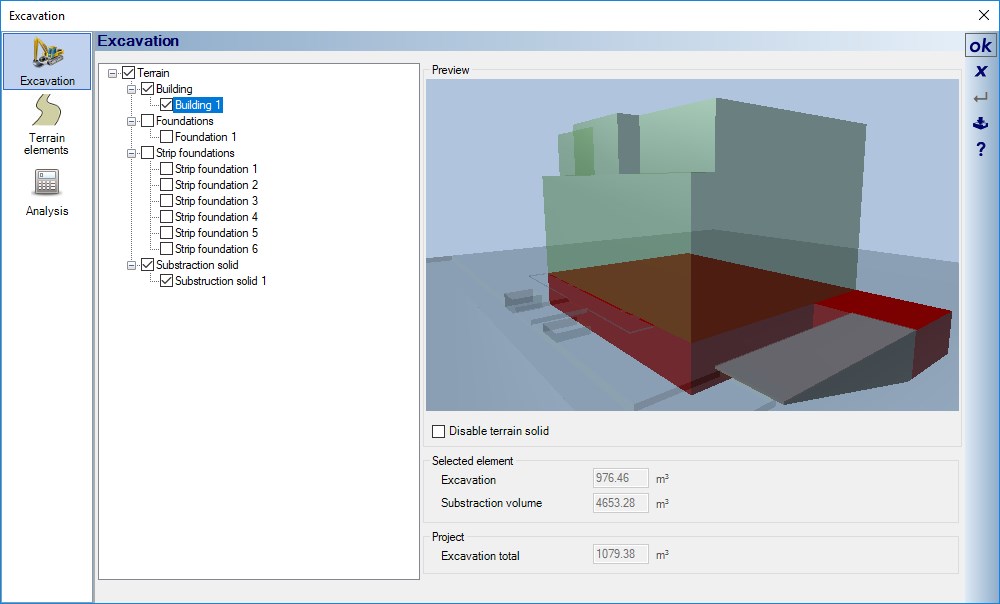
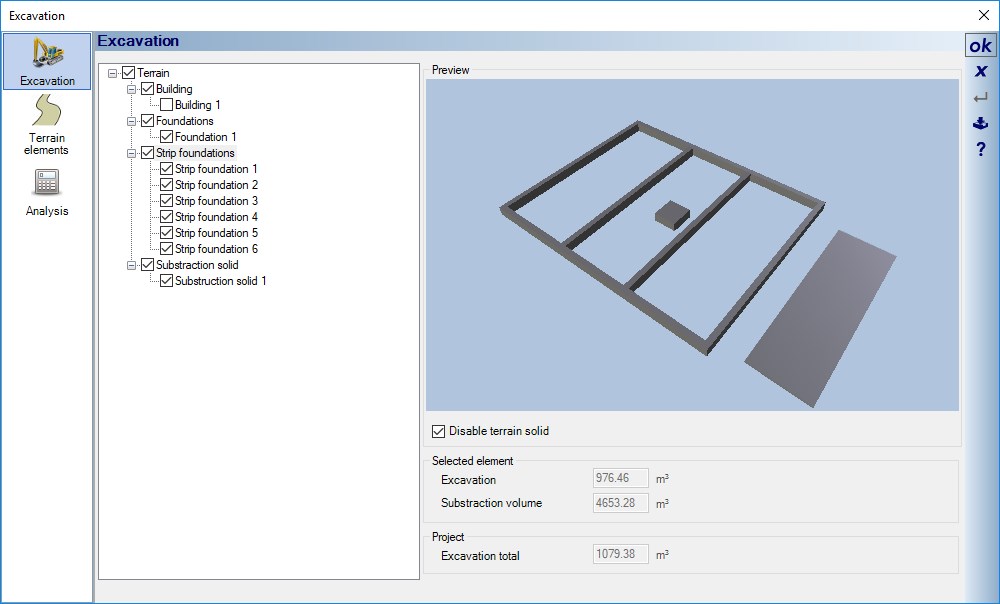
Excavation analysis
The dialog offers various evaluation options on the three property pages.
On the excavation page, it lists all building solids and 3D substraction solids that cut the terrain. All others would not be displayed here.
Depending on your selection in the tree view, the 3D preview shows which solid it is. The part of the 3D solid, which forms an intersection with the 3D terrain, is shown in red and parts above it in green
You see the building and the intersected volume in the terrain. as well as the 3D substraction solid from the PlugIn 3D Constructions, which creates the entrance to the underground car park at the right of the building.
In addition, you receive information about the terrain elements, so you can easily determine their surface, volume and excavation. The names of the elements come from the properties dialogs.
A summary of the values determined for further use can be found on the analysis page.
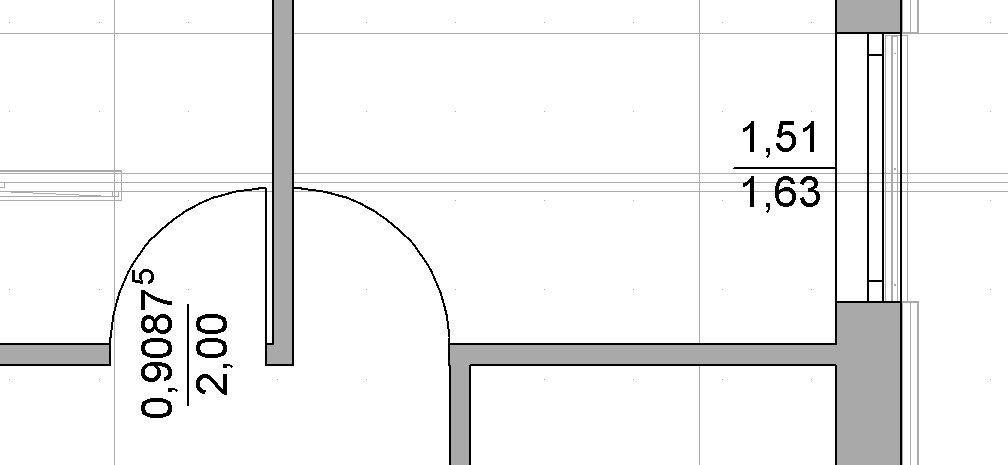
Dimensions for windows and doors on axis
Both windows and doors offer in the extended properties dialogs the possibility to show dimensions for the single element in 2D top views.
There are slight differences between the doors and the windows because the dimensions of the door are centered within the element and windows depending on the opening direction (optional).
Essentially, the properties are the same as those of the normal dimension, so you can also apply their properties via the checkbox. This is just in case you have already saved your own default settings for dimensions.
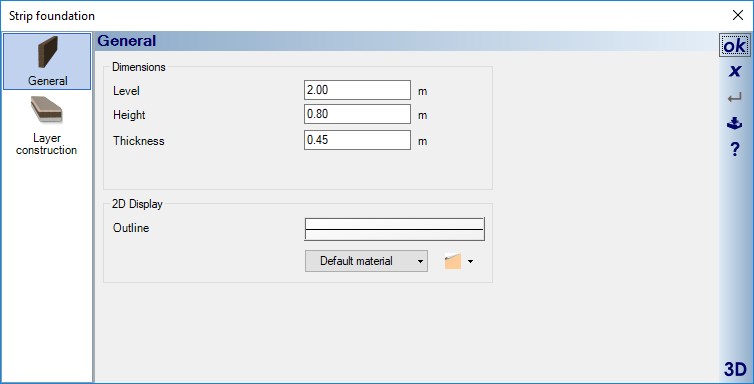
Foundations
Foundations were added as new component types, in the variants single foundations, strip foundations and bottom plate.
The dialogues and properties are similar to those of upper/ lower beams or ceilings.
The dialogues and properties are similar to those of upper/ lower beams or ceilings.
For foundations, there are two visible categories, separated according to strip foundation and single foundation (including bottom plate).
Strip and single foundations intersect with each other, similar to walls, to form a closed contour if necessary and not to overlap. This does not apply to bottom plates in this respect.
Foundations also appear as elements in the quantity PlugIn.
Strip and single foundations intersect with each other, similar to walls, to form a closed contour if necessary and not to overlap. This does not apply to bottom plates in this respect.
Foundations also appear as elements in the quantity PlugIn.
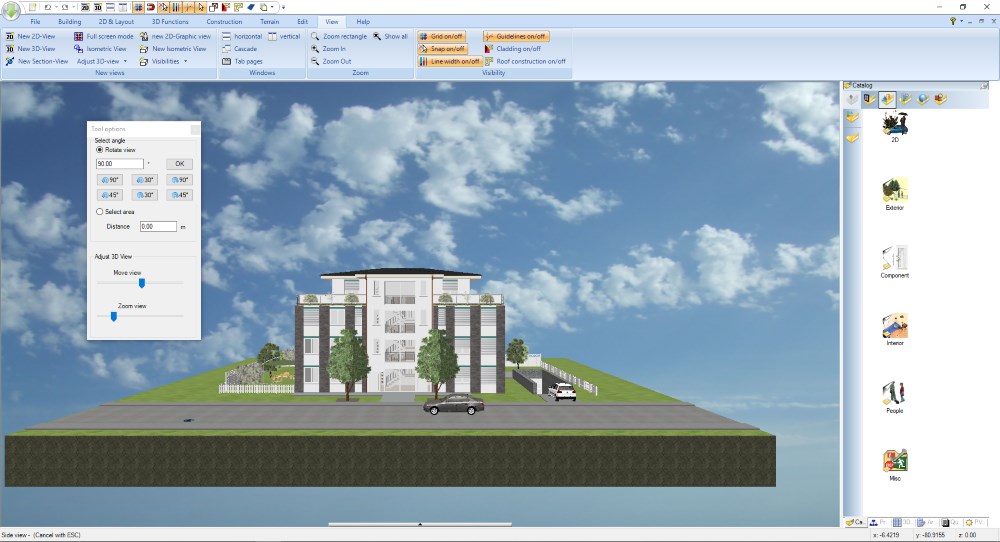
Adjusting 3D views
The adjust 3D view buttons offer two options that allow you to set your viewer's position in the active 3D view. Both options change the 3D view to another mode in which you only have the permissible functions for the navigation, in the view from the top you can then rotate and zoom around the z-axis only, with the arrow keys or the mouse. Views from the front only allow navigation left / right or up / down, no rotation. This view mode can be canceled with ESC.

Doors can now be opened in 3D views
Doors can now be opened in 3D views. To do this, select the door and select "Open door in 3D view ..." from the context menu. Alternatively, you can find the same option in the properties dialog of the door.
The context menu then opens a dialog in which you can activate the option and specify an opening angle. The option is required to be able to close the door again.
This function was often requested in order to display 3D views for the top, e.g. for apartment advertisements. Until now, in such cases, neither the hinges nor the opening direction of the doors were recognizable. But also for a more realistic representation of the scenes while walking or for 360 degree panorama sequences, in which you move from one room to the other and no longer walk through closed doors.
The option always rotates the entire door 3D object, so it makes sense to use it only for single doors.
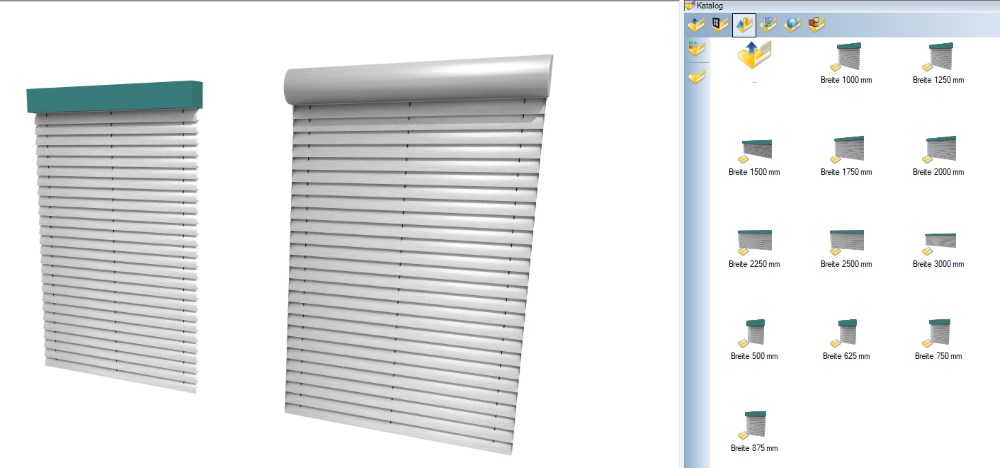

More than 650 new 3D objects, blinds, roller shutters, sliding shutters, radiators,...
Shutters and blinds for all common window formats. This also results in the large number of elements we have added.
The advantage is that a suitable 3D object should be available for practically every window size, so that the right 3D object can be used without scaling the object. The scaling of such objects leads to unrealistic representations in 3D visualization.
Questions? If you have a question about our products please email customercare@visualbuilding.co.uk